My daughter showed me another of her computer lab assignments. Just a random number transformation. She drew a sketch of the GUI along with some samples. We discussed the exercise requirements & I added some notes to the scrap paper. The design also needs to include an <EXIT> button.
ABOVE: My daughter's sketch of her computer lab project with some of my notes (& red markings).
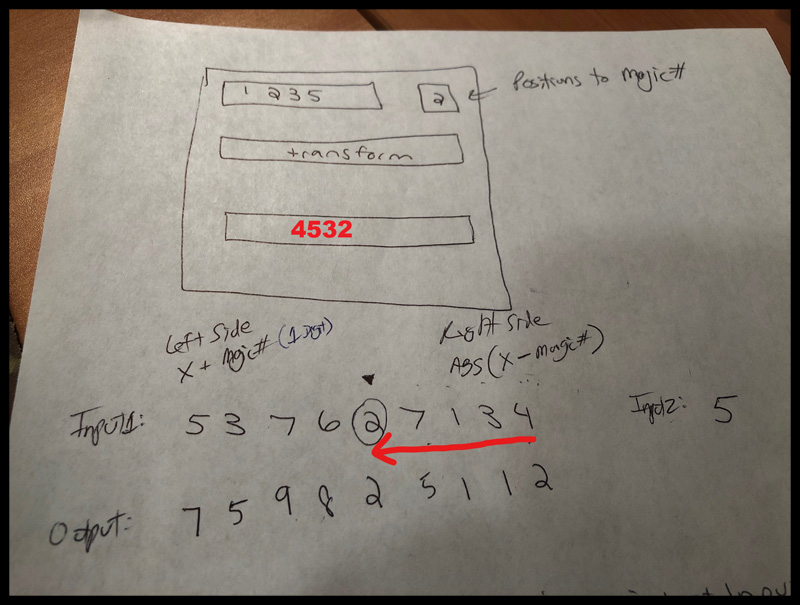
Requirements: A primary input field that will contain a base integer string and a secondary input that represents the number of positions (starting from the end) within the input string - the digit at that location I'll refer to as the "Magic Number". In the GUI sample sketch the primary value is "1235" and the secondary input is "2". Therefore the "Magic Number" is 2 positions from the end which is "3". It's the 3rd position from the beginning of the file. The transformation logic will add the "Magic Number" to each position to the left of the "Magic Number" and will subtract the "Magic Number" from all digits to the right. The Magic Number itself remains the same. Furthermore, the items to the left must be a single digit (only the ones place is retained) and the items on the right are absolute values.
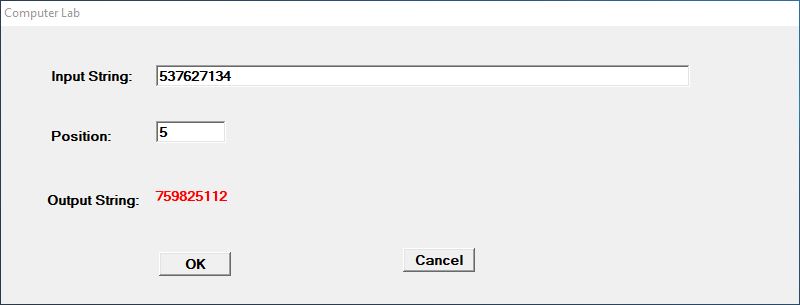
Another example is with the Base Number of 5 3 7 6 2 7 1 3 4 and the reverse offset position of 5.
The Magic Number is the fifth position from the end - the digit 2. It's also absolute position 5 in the string. Add 2 to each digit to the left of position 5 and subtract 2 from each to the right.
The Output Number is: 7 5 9 8 2 5 1 1 2
Position 7 clearly displays the Absolute Value: ABS(1 - 2) = 1
Here's another example that displays the formula context:
Input: 9 5 1 Offset Position: 2 The "Magic Number" is in the middle with a value of 5.
Output: 4 5 4
LEFT: 9 + 5 = 14 To isolate the 4 simply take the modulus when dividing by 10.
CENTER: 5 remains unchanged (Magic Number).
RIGHT: 1 - 5 = -4 Just wrap in the ABS function to convert to 4.
It's not a very difficult assignment but it highlights some important functions & concepts to the class - Substrings, Indexing, Length, Loops, Math Functions, Concatenation, etc.
Also a good exercise to show in action - so here's a quick PC/370 & WinBatch version.
PC/370 Solution:
I leveraged the Screen Template I created for the previous AGRAM Card Game. With just a few simple modifications it was ready to go...
ABOVE: The PC/370 Input Screen using Numeric Validation/Formating.
The Assembler Version is much more streamlined - due to the nature of Packed Data-Types I don't need to perform any explicit MOD() or ABS() function for either portion of the formula. In either case I'm OR'ing the sign bits to X'0F' and I'm only unpacking the last digit (No need to divide by 10 to extract the remainder).
The Input Fields are named AC1 & AC2 respectively. I'm using numeric format [@E#NUM] I developed for my TDACC.CPY data entry copybook. It ensures all characters are numeric, right justifies the data & zero pads on the left. The position has a max value of 13.
The comments within the code provide step-by-step explanation. Notice the zero-padded integers are not included in the calculation & are left blank in the output. The exception to that would be if the zero-padding was also the "Magic Number" based on the offset - in which case it would only be blank up to that point.
***********************************************************************
* CALCULATE *
***********************************************************************
DC F'0' RETURN ADDRESS SAVE AREA
CALC EQU *
ST 6,*-4 SAVE RETURN ADDRESS
*
MVC XBASE,AC1 MOVE INPUT BASE
PACK DUBB,AC2 PACK INPUT POSITION
CVB 3,DUBB CONVERT TO BINARY
*
LA 4,XBASE+L'XBASE POSITION ADDRESS POINTER
SR 4,3 SUBTRACT POSITION
PACK XMAGIC,0(1,4) PACK MAGIC NUMBER
ST 4,ADDR STORE ADDRESS POINTER
*
NI CALCLO+1,X'0F' INIT LEADING ZERO TEST
*
LA 3,OBASE LOAD RESULT ADDRESS
LA 4,XBASE LOAD STRING ADDRESS
CALC1 EQU *
CLI 0(4),X'FF' END OF STRING???
BE CALCX YES - EXIT ROUTINE
*
PACK XPACK,0(1,4) INITIALIZE FIELD
C 4,ADDR COMPARE ADDRESS
BE CALCGO EQUAL - FORMAT OUTPUT
BH CALCHI HIGH - SUBTRACT
CALCLO EQU *
BC 0,CALCLO2 LEADING ZERO BRANCH
CLI 0(4),C'0' LEADING ZERO?
BNE CALCLO2 NO - CONTINUE PLEASE
MVI 0(3),C' ' YES - MOVE BLANK
B CALC2 CONTINUE FORWARD
CALCLO2 EQU *
OI CALCLO+1,X'F0' RESET LEADING ZERO TEST
AP XPACK,XMAGIC ADD MAGIC NUMBER
B CALCGO FORMAT TRANSFORMATION
CALCHI EQU *
SP XPACK,XMAGIC SUB MAGIC NUMBER
CALCGO EQU *
OI XPACK+1,X'0F' SET ABSOLUTE VALUE
UNPK 0(1,3),XPACK+1(1) UNPACK OUTPUT DIGIT
CALC2 EQU *
LA 4,1(,4) BUMP STRING POINTER
LA 3,1(,3) BUMP RESULT POINTER
B CALC1 TEST NEXT DIGIT
CALCX EQU *
L 6,CALC-4 RESTORE LINK REGISTER
BR 6 BRANCH ON LINK REGISTER
***********************************************************************
EJECT
***********************************************************************
* WORKING STORAGE *
***********************************************************************
XBASE DC CL13' ',X'FF' INPUT BASE STRING
XPACK DC PL2'0' PACKED NUMBER FIELD
XMAGIC DC PL2'0' MAGIC NUMBER
DUBB DC D'0' INPUT BASE POSITION
ADDR DC A(XBASE) INITIALIZE ADDRESS
OBASE DC CL13' ',C'$' OUTPUT BASE STRING
***********************************************************************
<SNIP>
***********************************************************************
AC1 DC CL13' ',C'$' ACCEPT - INPUT
AC2 DC CL2' ',C'$' ACCEPT - POSITION
***********************************************************************
NOTE - When data fields are followed by an individual C'$' that means they are used in @WTO operations. In PC/370 the Write-To-Operator messages are terminated with a $ sign.
WinBatch:
The WinBatch version is much easier - especially the GUI Dialog to enter the input values.
ABOVE: WinBatch Data Entry created using Dialog Editor.
The GUI Dialog doesn't have real-time Numeric Validation like I built into the PC/370 screen. Therefore the first part of the routine below does some basic validation & exits if there's something wrong (highlighted in yellow). Non-integer values and an offset position not within the range of 1 up to the string length are violations - the output displays the message "***Invalid Data Entry***".
;**********************************************************************
;* Process Main *
;**********************************************************************
:Process_Main
O_base = "***Invalid Data Entry***"
if IsInt(I_base) == @FALSE
goto Process_Main_Exit
endif
if IsInt(I_pos) == @FALSE
goto Process_Main_Exit
endif
if I_pos < 1
goto Process_Main_Exit
endif
if I_pos > StrLen(I_base)
goto Process_Main_Exit
endif
W_len = StrLen(I_base)
W_pos = (W_len - I_pos) + 1
W_magic = StrSub(I_base, W_pos, 1)
O_base = ''
for x = 1 to W_len
W_num = StrSub(I_base, x, 1)
W_new = W_magic
if x < W_pos
W_new = (W_num + W_magic) mod 10
else
if x > W_pos
W_new = Abs(W_num - W_magic)
endif
endif
O_base = StrCat(O_base, W_new)
next
:Process_Main_Exit
Return
;**********************************************************************
Another fun little puzzle...
Previous 370 Assembler Posts:
https://tdxbits.blogspot.com/2019/03/pc370-assembler-object-code-translator.html
https://tdxbits.blogspot.com/2019/03/mvs370-assembler-like-building-with.html
https://tdxbits.blogspot.com/2019/03/pc370-assembler-creation-stars-stripes.html
https://tdxbits.blogspot.com/2019/04/resourceful-solution-using-ibm-dfsort.html
https://tdxbits.blogspot.com/2019/04/caroscoe-libi-interface-read-member.html
https://tdxbits.blogspot.com/2019/11/acsl-agram-card-game-pc370-version.html
https://tdxbits.blogspot.com/2019/11/acsl-agram-pc370-keyboard-input.html
https://tdxbits.blogspot.com/2019/12/pc370-assembler-object-code-translator.html
https://tdxbits.blogspot.com/2019/12/interesting-grid-algorithm-pc370-sqr.html
Tony DeLia - PeopleSoft Developer | Technical Consultant. Enjoying a productive career in the Information Technology profession, with significant expertise developing pc, client-server, mainframe, relational database & ERP package solutions (PeopleSoft/Oracle). Welcome to my Blog... enjoy the smattering of bits, bytes, & words (that's lo-level machine code lingo)... This blog will serve as a historical monument to some of my past work.
Friday, December 13, 2019
Thursday, December 5, 2019
Interesting GRID Algorithm - PC/370-SQR-Excel Solutions
Previous Game Algorithm - SQR, WinBatch & PC/370 versions:
https://tdxbits.blogspot.com/2019/11/acsl-agram-card-game-exercise-just-for.html
https://tdxbits.blogspot.com/2019/11/acsl-agram-card-game-pc370-version.html
https://tdxbits.blogspot.com/2019/11/acsl-agram-pc370-keyboard-input.html
One of my personal "features" is a form of OCD (Obsessive Compulsive Disorder). I admit my symptoms of OCD can often be quirky in nature & provide no value whatsoever. A useless example would be when I have an itch on my left arm -- I scratch it -- then scratch the right side. No reason... I just do it - I have to do it. Absurd.
But other forms of OCD can be a valuable asset - especially for an Application Developer. Every line of code I write must be properly constructed, indented & commented. Even a slight typo drives me nuts & compels me to correct it. There's one typo exception I didn't correct - which is the incorrect spelling of "translater" on my PC/370 Object Code Translator demo. Creating a complex application with object code, SVC/DOS Interrupt mapping & tedious formatting punctuated with a glaring Dum-Dum typo on the main screen seemed ironic in a comedic sense - so I left it.
Another of my OCD "quirks" is automating various procedures - mundane tasks, repetitive functions, useful utilities & just plain interesting concepts - for fun. Similar to my daughter's computer lab assignment for the AGRAM card game (links above).
I bumped into an interesting Sequence Guessing Game presented on a blog by Gaetano Causio.
A cascading series of numbers with a distinct pattern for every cell. Once I solved the puzzle I had to code the algorithm. Below you'll find versions in PC/370, SQR and Excel Formulas.
ABOVE: The original puzzle from Gaetano's blog. You should give it a try...
Before proceeding any further you should visit Gaetano's site & give the puzzle a try. He also provides the solution as well as the meaning behind the algorithm. CLICK HERE
Welcome back! I hope you were able to solve the puzzle... now for the solution & some coding:
I was able to solve the puzzle fairly quick - within 10 minutes (maybe 5) - honest - but I may have gotten lucky. I noticed several obvious patterns - the diagonal 1's - diagonal 2,4,6,8 - binary factors in the right column. Seemed coincidental. So my focus turned to the inner cells where 24 caught my eye - along with the 6 & 12 above it. Doubling the 6 was somewhat random but that's how the mind works - it produced a result of 24. I shifted a cell & found the pattern also worked for the 8 (1*2 + 6). Visually it appears the limits of the algorithm had been reached - there was no cell above the 1. But conceptually there is - nothing on top PLUS 1 to the right yields 1. The pattern is true. Then moving to the 16 - there is an 8 on top but nothing to the right - 8*2 + nothing yields 16. If you treat all whitespace as zero the formula works perfectly for rows 2 thru infinity - the first cell in the first row has a hard-coded seed value of 1.
One thing I didn't realize was the correlation between the formula and dimensions - 1D (point), 2D (line), 3D (plane), 4D (cube), 5D (cube within a cube), etc. Gaetano provides an explanation of that aspect. Pretty cool stuff...
I'm going to start with the Excel solution since it's easy to replicate & provides the perfect visualization of a grid. Also I'm flipping the slope so it cascades to the right instead of the left therefore flipping the orientation of the adjacent component of the formula - from right to left. This makes coding easier as demonstrated by the Excel example.
Excel Solution:
Column A will represent the "nothing" values on the edge of the grid. Column B is where the values start & spread out towards the right with each row.
Cell B1 contains the value 1 - That is our starting seed.
Place the following formula in Cell B2: =B1*2+A1 (Double the overhead cell PLUS it's left adjacent cell). Replicate (copy/paste) the formula across every cell on the row (thru Z). Then Copy/Paste all cells on row 2 thru row 25. The formula changes relative to each cell - for example, the whitespace cell D2 has the formula =D1*2+C1 - which yields nothing. Perfect.
ABOVE: Excel Solution - All cells from B2 thru Z26 are formula driven (including whitespace).
PC/370 Version:
I'll replicate the formula in PC/370 using a 15 row by 16 column grid - with each cell defined as PL8'0'. That's 240 cells initialized to zero or 240PL8'0'.
***********************************************************************
* GRID DEFINITION *
***********************************************************************
GRID DS 0F FULLWORD ALIGNMENT
DC 240PL8'0' GRID - 15 ROWS X 16 COLS
GRIDX DC XL1'FF' END OF GRID
***********************************************************************
ABOVE: 15 Row x 16 Column Grid - all cells initialized to zero.
The first cell in each row is set to zero & acts like the A column in the Excel example (it just provides a zero or nothing value for the formula). The next position holds the seed value of 1 - that's relative position GRID+8(8) - which translates to B1 in Excel.
ZAP GRID+8(8),=PL1'1' SET SEED NUMBER 1
*
LA 4,GRID+16*8 LOAD ROW 2 ADDRESS
LOOP1 EQU *
CLI 0(4),X'FF' END OF TABLE??
BE LOOP1X YES - EXIT LOOP PLEASE
*
LA 4,8(,4) BYPASS FIRST COLUMN
LA 3,15 SET COLUMN COUNT
LOOP2 EQU *
LR 5,4 LOAD CELL ADDRESS
S 5,=A(17*8) BUMP TO TOP/LEFT CELL
ZAP 0(8,4),8(8,5) LOAD OVERHEAD CELL
MP 0(8,4),=PL1'2' MULTIPLY BY 2
AP 0(8,4),0(8,5) ADD ADJACENT CELL
LA 4,8(,4) BUMP CURRENT CELL
BCT 3,LOOP2 CALCULATE NEXT CELL
LOOP2X EQU *
B LOOP1 READ NEXT ROW
LOOP1X EQU *
ABOVE: Populating the Grid using the algorithm - Overhead Cell*2 Plus Top Left Cell.
Register 4 points to the current cell 0(8,4) while register 5 is set to the overhead cells (17 cells away). Specifically, 0(8,5) is the overhead adjacent left cell and 8(8,5) is the overhead cell. ZAP, MP and AP then move on to the next cell.
The output routine simply loops through the GRID again & places the cell values on the print line (using ED without a significant digit in the pattern). See SQR Output below.
SQR Version:
In the SQR version I create a 16 x 16 array - with index row 0 unused (for clarity) & column 0 used to hold the nothing (zero) values for the left edge formulas. Then loop through rows 2 thru 15 to populate the array.
! CALCULATE CELL VALUES
create-array name=GRID size=16 field=CELL:number:16=0
let #MAXrow = 15
let #MAXcol = 15
let GRID.CELL (1,1) = 1
let #row = 2
while #row <= #MAXrow
let #col = 1
while #col <= #MAXcol
let #valTOP = GRID.CELL (#row - 1, #col)
let #valADJ = GRID.CELL (#row - 1, #col - 1)
let #valCELL = #valTOP * 2 + #valADJ
let GRID.CELL (#row, #col) = #valCELL
let #col = #col + 1
end-while
let #row = #row + 1
end-while
Printing results on a report:
! PRINT RESULTS
let #row = 1
while #row <= #MAXrow
print ' ' ( +1, 1, 0 )
let #col = 1
while #col <= #MAXcol
let #valCELL = GRID.CELL (#row, #col)
if #valCELL > 0
print #valCELL ( 0, +2, 0 ) edit 999999999
end-if
let #col = #col + 1
end-while
let #row = #row + 1
end-while
Output of SQR version (same as Excel & PC/370):
ABOVE: Portion of the GRID output.
That pretty much covers everything... a fun exercise. Creating this blog post took more time than it did to solve the puzzle and create the Excel, SQR & PC/370 versions of the solution.
Crystal Check Reprint Utility - Archive
Here's something for the Archives. Several years ago PeopleSoft dropped support for Crystal Checks in favor of BI Publisher. Prior to that our organization switched from in-house printing to an external vendor (Dec'2012). Nonetheless this is a pretty slick solution I developed previously for both AP Paycycle Automation as well as the ability to quickly reproduce any batch of checks (or portion). No need to reset Paycycle Manager flags or other settings.
The key to the solution is the RUN_Init() functionality I created when I initially started (July'2004). This allows me to stage a Process Scheduler Request from virtually any application. A good example of this capability is the SQL*Engine @RUN= directive I highlighted in a previous post. I created a simple utility TDCHKPRT.SQR to read one or more reprint requests and send the parameters to the staging routine. That's it...
It takes minutes to respond to an emergency request from Cash Management & quickly reproduce the checks they need.
An actual scenario:
On 05/11/2010 there was a hardware issue with the NSS3 Check Printer. Four Check Print jobs were left in the print queue that had to be re-staged & directed to another printer (NSS). Using the process instance numbers I could extract the original run control parameters to reprocess the Crystal checks.
ABOVE: The four jobs that need to be re-queued. To obtain the parameters of each click on “Details” followed by the “Parameters” hyperlink (or query the Process Request tables directly).
Process Request Parameters:
All the information needed to reprint the check batch.
ABOVE: A view of the Command Line details.
The Command Line parameters must be copied & extracted for use in the TDCHKPRT SQR program. The program has two sets of $RCX variables – one for the runtime flags the other for the Crystal Report parameters. The $RCX_OP (Output) flag has been changed to “NSS” instead of the original -OPNSS3 setting (above). All other flags are the same. The positional parameters at the end of the command line are fed in sequence using the $RCX_P01 thru $RCX_P08 variables (#RCX_ctr passes the parameter count of 8).
Check Reprint Utility - TDCHKPRT:
Below is a portion of code that sets the required parameters to run a Crystal Report instance through Process Scheduler. For demonstration purposes the variables have been set to literal values (hard-coded) instead of looping through a file containing the 4 required runs for this example. You can see how the parameters line up with the information from the original process request along with the printer redirection (NSS).
let $I_gen = '3'
let $I_prcs = 'APY2021-'
let $I_id = 'PSBATCH'
let $I_rc = '000001'
let #RCX_ctr = 8
let $RCX_P01 = '000001'
let $RCX_P02 = '1401'
let $RCX_P03 = '10100'
let $RCX_P04 = 'JP001'
let $RCX_P05 = '0002'
let $RCX_P06 = 'CHK'
let $RCX_P07 = '0200121041'
let $RCX_P08 = '0200121260'
let $RCX_RP = 'CHECK5'
let $RCX_OT = '3'
let $RCX_OP = 'NSS'
let $RCX_SVR = 'PSNT'
let $RCX_LG = 'ENG'
do RUN_Init($I_gen, $I_prcs, $I_id, $I_rc, #O_pi)
show 'PI: ' #O_pi
<SNIP>
#include 'xx_tdf.sqc' !TD Custom SQR Function Library
#include 'xx_run.sqc' !TD Custom Process Scheduler Request
#include 'xx_idb.sqc' !TD Custom Interface API
The included custom SQC files perform a variety of tasks including the staging of a new process request (XX_RUN.SQC). The XX_IDB SQC facilitates Interface File Integration - the file containing the required check print specifications is dropped in a target folder & processed automatically.
File Input:
Below is a file containing the specific run parameters of each group of checks that needs to be run along with the redirected check printer destination - NSS3 to NSS.
000001 1401 10100 JP001 0002 CHK 0200121041 0200121260 PSNT NSS
000001 1401 12000 JP001 0006 CHK 0600028481 0600028500 PSNT NSS
000001 1401 23700 JP001 0046 CHK 4600001679 4600001685 PSNT NSS
000007 455 13100 JP001 0011 CHK 1100074112 1100074387 PSNT NSS
Within the file the exact lo/hi range of check numbers may be designated or a smaller portion if that's what is required. A possible scenario includes a smaller group was damaged after printing & needs to be reprinted. Maybe a single check had coffee spilled on it. The principal remains the same.
RUN_Init() - Load Process Scheduler Request:
A small glimpse into the XX_RUN.SQC module - a very small glimpse!
!**********************************************************************
!* *
!* MODULE: XX_RUN.SQC *
!* AUTHOR: TONY DELIA. *
!* DATE: 03/23/2005. *
!* SYSTEM: NSS/ADVANCE PUBLICATIONS - PS 8.X HR/FIN. *
!* DESC: STAGE PROCESS SCHEDULER REQUEST. *
!* *
!**********************************************************************
!* *
!* TABLES: ps_prcssequence - Update, Select *
!* psdbowner - Select *
!* psprcsruncntl - Select *
!* ps_prcsruncntldtl - Select *
!* ps_prcsruncntldist - Select *
!* ps_prcsruncntleopt - Select *
!* ps_prcsdefn - Select *
!* ps_prcstypedefn - Select *
!* ps_prcsjobitem - Select *
!* ps_prcsrqstdist - Insert *
!* ps_cdm_auth - Insert *
!* ps_cdm_list - Insert *
!* psprcsrqsttext - Insert *
!* psprcsparms - Insert *
!* psprcsque - Insert, Update *
!* psprcsrqst - Insert, Update *
!* ps_xx_rb_uri - Select *
!* *
!**********************************************************************
!**********************************************************************
!* *
!* GLOBAL VARIABLES FOR CRYSTAL REPORTS *
!* =========================================================== *
!* #RCX_CTR - PARAMETER COUNT (1 THRU 10) *
!* $RCX_P01 - PARAMETER1 ($RCX_P01 thru $RCX_P10 if needed) *
!* $RCX_SVR - SERVER (PSNT [default] or PSNT2) *
!* *
!* Optional Report Flags: *
!* $RCX_RP - REPORT NAME. *
!* $RCX_OT - OUTPUT TYPE. *
!* $RCX_OP - OUTPUT PATH. *
!* $RCX_LG - LANGUAGE CODE. *
!* *
!* $RCX_CLEAR - CLEAR ALL PARMS UPON EXIT (Y/N - Y=Default). *
!* *
!* RUN DATE/TIME GLOBAL VARIABLE: *
!* $RCX_dttm - REQUEST DATE/TIME (YYYYMMDD_HH:MI) *
!* *
!**********************************************************************
This utility served me (and Cash Management) well for many years!
Monday, December 2, 2019
PC/370 Assembler Object Code Translator Demo Files
Previous Post: PC/370 Assembler Object Code Translator
With regard to my previous PC/370 Object Code Translator post the components are now available to test on your own Windows machine. Later versions of Windows require DOSBOX to execute (Information below).
This was posted under the LinkedIn Group: Mainframe Assembler Programmers
TD021 Demonstration ZIP File: CLICK HERE
TD021 Demo - ZIP Contents:
TD021.COM - PC/370 Executable COM File
E370R42.EXE - PC/370 Runtime Execution Module
@TD021_demo.txt - Instructions
E370R42.EXE is the PC/370 Runtime Execution Module. It is part of the archived PC/370 R4.2 Package created by Donald Higgins. There are numerous sites where the package may be downloaded from (not required to run the demo).
Here's one of the Free Download sites: CLICK HERE
ABOVE: PC/370 Object Code Translator Application.
TD021 Function Keys:
KEY FUNCTION
======= ==============================
@K#ESC EXIT PROGRAM
@K#PGDN PGDN - Pg Down (16 lines)
@K#PGUP PGUP - Pg Up (16 lines)
@K#F1 F1 - Page Down (16 lines)
@K#F2 F2 - Page Up (16 lines)
@K#F3 F3 - Page Down ( 1 line )
@K#F4 F4 - Page Up ( 1 line )
@K#ARWD DOWN - Pg Down ( 1 line )
@K#ARWU UP - Pg Up ( 1 line )
@K#TAB TAB - Forward Half-Word
@K#TABL Shft-TAB - Back Half-Word
@K#ARWL LEFT - Back Half-Word
@K#F10 F10 - Step thru code (50)
@K#HOM HOME - Top of Module
@K#END END - End of Module
======= ==============================
OTHER KEYS will tab through each instruction (or a halfword if not a recognizable instruction).
DOSBOX can be downloaded for free at DOSBOX.COM
ABOVE: DOSBOX installed & running. MOUNT the C: drive, navigate to the demo folder (PC370X) & launch the TD021 process.
Running the Demo is very simple.
Unzip the demo files into a folder (I'm using C:\PC370X).
Install & Launch DOSBOX from your desktop
Perform the following line commands:
Z:\> MOUNT C C:\
Z:\> C:
C:\> CD PC370X
C:\> TD021
The process evaluates the opcode at the current offset pointer & displays the attributes along with the translated source code. If it is not a recognizable opcode it displays the hexadecimal values for a generic halfword. The pointer is recalculated based on the instruction length or the particular navigation key pressed.
NOTE - This is a simple translator based on the current pointer position - it is not a live "real-time" debugger tool. Using the TAB keys (TAB=Forward & Shift-TAB=Backward) the pointer is moved & evaluated in halfword increments - the resulting source code displayed is not an accurate representation of the actual module - it is indicative of the pointer position only.
Thanks for the positive feedback - hope someone finds this interesting & fun...
Previous 370 Assembler Posts:
https://tdxbits.blogspot.com/2019/03/pc370-assembler-object-code-translator.html
https://tdxbits.blogspot.com/2019/03/mvs370-assembler-like-building-with.html
https://tdxbits.blogspot.com/2019/03/pc370-assembler-creation-stars-stripes.html
https://tdxbits.blogspot.com/2019/04/resourceful-solution-using-ibm-dfsort.html
https://tdxbits.blogspot.com/2019/04/caroscoe-libi-interface-read-member.html
https://tdxbits.blogspot.com/2019/11/acsl-agram-card-game-pc370-version.html
https://tdxbits.blogspot.com/2019/11/acsl-agram-pc370-keyboard-input.html
Subscribe to:
Posts (Atom)